
Xantrex C12
Xantrex C12 태양광 충전 컨트롤러 12 Amps 사용 설명서
모델 : C12
1. 서론
This manual provides essential information for the safe and efficient operation of your Xantrex C12 Solar Charge Controller. The C12 is a sophisticated 12-amp controller designed for charge, lighting, or load management in solar power systems. It features three-stage charging, user-definable voltage parameters, and automatic equalization to optimize battery performance and longevity. Please read this manual thoroughly before installation and use.
2. 안전 정보
Always observe the following safety precautions to prevent personal injury and damage to the controller or other equipment.
- 모든 배선의 크기가 적절하고 적절하게 절연되어 있는지 확인하세요.
- Always disconnect power from the solar array and battery before installing or servicing the controller.
- Install the controller in a dry, well-ventilated area, away from flammable materials.
- Do not attempt to open or repair the controller. Refer all servicing to qualified personnel.
- 배터리를 다룰 때는 눈 보호구를 포함한 적절한 개인 보호 장비를 착용하십시오.
3. 패키지 내용
패키지에 모든 품목이 들어 있는지 확인하세요.
- Xantrex C12 Solar Charge Controller (1 unit)
- 사용 설명서(본 문서)
4. 설정 및 설치
The Xantrex C12 controller is designed for quick and easy setup. Follow these general steps for installation:
- 설치: Choose a suitable location for mounting the controller. It should be close to the battery, in a cool, dry, and well-ventilated area, protected from direct sunlight and moisture.
- 배터리 연결: Connect the battery to the controller's battery terminals first. Ensure correct polarity (positive to positive, negative to negative). This step is crucial for the controller to sense battery voltage.
- 태양 전지 패널 연결: Connect the solar panel array to the controller's solar input terminals. Again, observe correct polarity.
- 부하 연결(선택 사항): If using the controller for load management, connect your DC loads to the designated load terminals. Ensure the total current draw of the loads does not exceed the controller's rated amp분노.
- 확인: 전원을 연결하기 전에 모든 연결부가 단단히 고정되었는지, 극성이 올바른지 다시 한번 확인하십시오.
중요한: Always connect the battery first and disconnect it last. Failure to do so may damage the controller.
5. 사용 설명서
The Xantrex C12 controller automatically manages the charging process and load distribution.
- 쓰리-에스tage 충전 중: The controller employs a three-stage charging algorithm (bulk, absorption, float) to efficiently charge your battery and prolong its lifespan.
- 사용자 정의 가능 볼륨tage 매개변수: The C12 allows for customization of voltage setpoints to match specific battery types and requirements. Refer to the display indicators section for details on HVD (High Voltage Disconnect) and UVD (Low Voltage Disconnect) settings.
- Automatic Equalization: The controller can perform automatic equalization cycles, which are crucial for maintaining the health of flooded lead-acid batteries. The "EQUALIZE ACTIVATED" indicator will illuminate during this process.
- 부하 제어: When configured for load control, the controller will disconnect the load if the battery voltage는 Low Vol 아래로 떨어집니다.tage Disconnect (LVD) threshold to protect the battery from deep discharge.
6. 디스플레이 표시기
The front panel of the Xantrex C12 features an intuitive LED display to indicate battery status and operational modes.
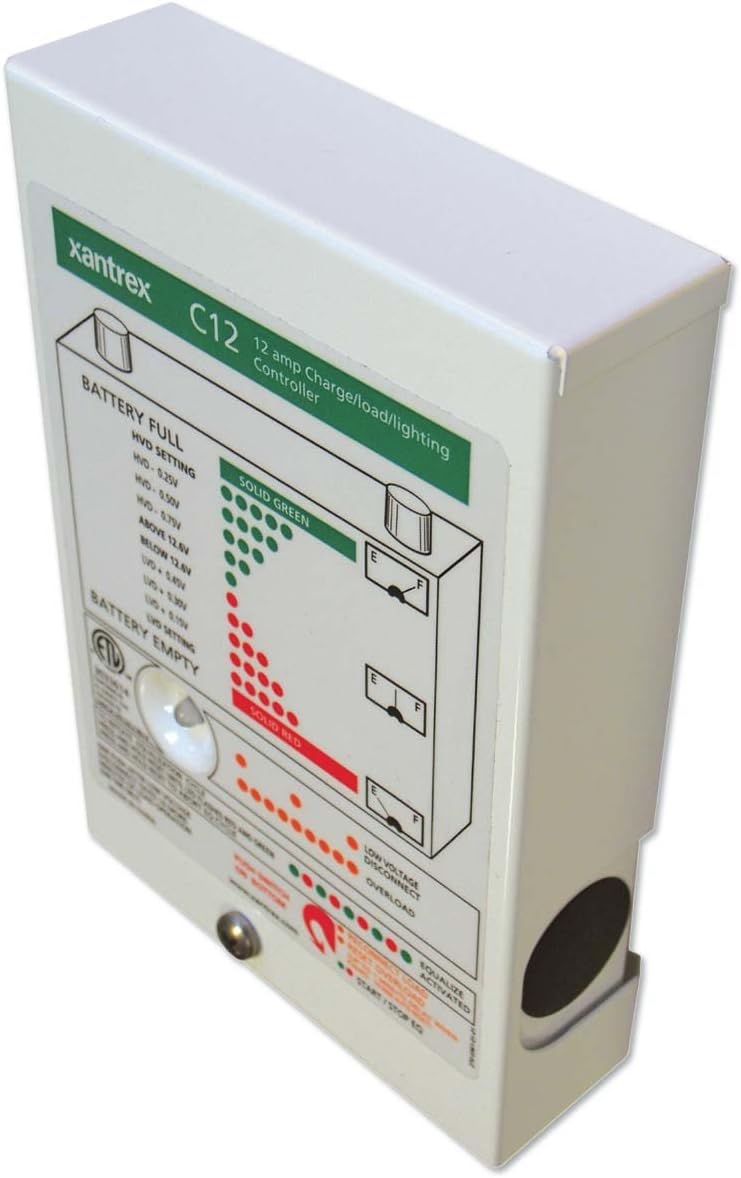
그림 1: 전면 view of the Xantrex C12 Solar Charge Controller, showing the LED indicator panel.
The LED panel provides visual feedback on the system's status:
- BATTERY FULL (Solid Green LEDs): Indicates the battery is fully charged or near full. The specific voltage thresholds for High Voltage Disconnect (HVD) are displayed on the panel (e.g., HVD - 0.25V, HVD - 0.50V, HVD - 0.75V, ABOVE 12.8V).
- BATTERY EMPTY (Solid Red LEDs): Indicates the battery is discharged or near empty. The specific voltage thresholds for Low Voltage Disconnect (UVD) are displayed (e.g., BELOW 12.8V, UVD - 0.50V, UVD - 0.75V, UVD - 1.0V).
- 낮은 볼륨TAGE DISCONNECT (Orange/Red LEDs): 배터리 용량이 부족할 때 켜집니다.tage drops below a critical level, and the load has been disconnected to protect the battery.
- OVERLOAD (Orange/Red LEDs): Indicates that the connected load is drawing excessive current, potentially causing the controller to shut down the load output.
- EQUALIZE ACTIVATED (Green LED): Lights up when the automatic battery equalization cycle is active.
- START/STOP EQ (Button): A push-button located at the bottom of the panel to manually initiate or stop an equalization cycle.
7. 유지관리
The Xantrex C12 Solar Charge Controller requires minimal maintenance.
- 정기 검사: 모든 배선 연결부의 견고성과 부식 여부를 주기적으로 점검하세요.
- 청소: Keep the controller's exterior clean and free of dust. Use a dry cloth; do not use liquid cleaners.
- 통풍: 과열을 방지하기 위해 통풍구가 막히지 않도록 하십시오.
8. 문제 해결
If you encounter issues with your Xantrex C12 controller, refer to the following common problems and solutions:
| 문제 | 가능한 원인 | 해결책 |
|---|---|---|
| 디스플레이 없음/전원 없음 | Loose battery connection, reversed polarity, blown fuse (external) | Check battery connections and polarity. Inspect external fuses. |
| 배터리가 충전되지 않음 | No solar input, reversed solar polarity, faulty solar panel, battery already full | Check solar panel connections and polarity. Verify solar panel output. Monitor battery status. |
| Load disconnected (Low Voltage Disconnect LED on) | 배터리 용량tag너무 낮다 | Allow battery to charge. Reduce load. |
| 과부하 LED 켜짐 | Excessive current draw from load | Reduce the connected load. Check for short circuits in the load wiring. |
If the problem persists after attempting these solutions, contact Xantrex customer support.
9. 사양
| 특징 | 세부 사항 |
|---|---|
| 상표 | Xantrex |
| 모델 | C12 |
| Amp에라 지 | 12 Amps |
| 권tage | 12 볼트 |
| 디스플레이 유형 | LCD (LED indicators on front panel) |
| 품목 무게 | 1.35파운드(0.61kg) |
| 패키지 크기 | 6.7 x 4.8 x 1.8인치(17 x 12.2 x 4.6cm) |
| 재료 | 금속, 플라스틱 |
| 한국어: | 687873000520 |
10. 보증 및 지원
For detailed warranty information, please refer to the warranty card included with your product or visit the official Xantrex web대지.
If you require technical assistance or have questions not covered in this manual, please contact Xantrex customer support through their official web현장 또는 지정된 지원 채널.
Ask a question about this manual
Ask about setup, troubleshooting, compatibility, parts, safety, or missing instructions. Manuals+ will review the question and use this page’s manual context to help answer it.