1. 서론
This 2-person dome tent features a unique frame structure. Designed for lightweight performance, the flysheet is made from 30D nylon ripstop fabric, which is very light yet reinforced with a grid-like ripstop pattern for enhanced tear strength. Its low weight makes it ideal for touring camps or solo camping where ample space is desired.
The most distinctive feature is its freestanding capability with just the frame and ground sheet. Even without the inner tent, covering it with the flysheet creates a compact and charming mini-shelter. It is sure to be useful in various scenarios, such as day camps, outdoor festivals when shade is needed, or beach outings. An all-rounder you'll find yourself choosing repeatedly.

Image: The Snow Peak Landbreeze Duo Tent, representing the brand's tent heritage.
2. 패키지 내용
패키지에 다음 구성 요소가 모두 포함되어 있는지 확인하세요.
- Main unit (Flysheet / Inner Tent)
- 메인 프레임
- 센터 프레임
- Ropes (1.5m x 6)
- Duralumin Y-pegs (x15)
- 프레임 케이스
- 페그 케이스
- 수리용 파이프
- 심 그립 에이전트
- 가방을 기내
- 사용 설명서
3. 안전 정보
- 화재 위험: 텐트 천에 화염이나 열원이 닿지 않도록 하십시오. 텐트는 가연성 소재로 만들어졌습니다.
- 통풍: Ensure adequate ventilation to prevent suffocation and condensation. Do not use fuel-burning appliances inside the tent without proper ventilation.
- 날씨 조건: Do not set up the tent in extreme weather conditions such as strong winds, heavy rain, or lightning.
- 날카로운 물건: Keep sharp objects away from the tent fabric and poles to prevent damage.
- 어린이들: Keep children away from the tent during setup and takedown. Do not allow children to play unsupervised inside the tent.
4. 설정 지침
Follow these steps to properly set up your Landbreeze Duo Tent:
- 사이트 준비: Choose a flat, clear area free of sharp objects. Lay out the inner tent or ground sheet.
- 기둥을 조립하세요: Connect the sections of the main frame and center frame poles.
- Attach Poles to Inner Tent: Insert the ends of the main frame poles into the grommets on the inner tent. Secure the poles to the inner tent clips.
- Attach Flysheet: Drape the flysheet over the inner tent, aligning the doors and vents. Secure the flysheet to the poles using the buckles and straps.
- Secure with Pegs and Ropes: Stake down all peg points around the base of the tent. Attach the ropes to the designated loops on the flysheet and stake them out to provide stability, especially in windy conditions.
- Freestanding Shelter Mode: For a lightweight shelter without the inner tent, assemble the frame and ground sheet, then attach only the flysheet.

Image: Inner tent with poles partially assembled.

Image: Fully assembled tent with flysheet.

Image: Detail of grommet fixing for tent poles.
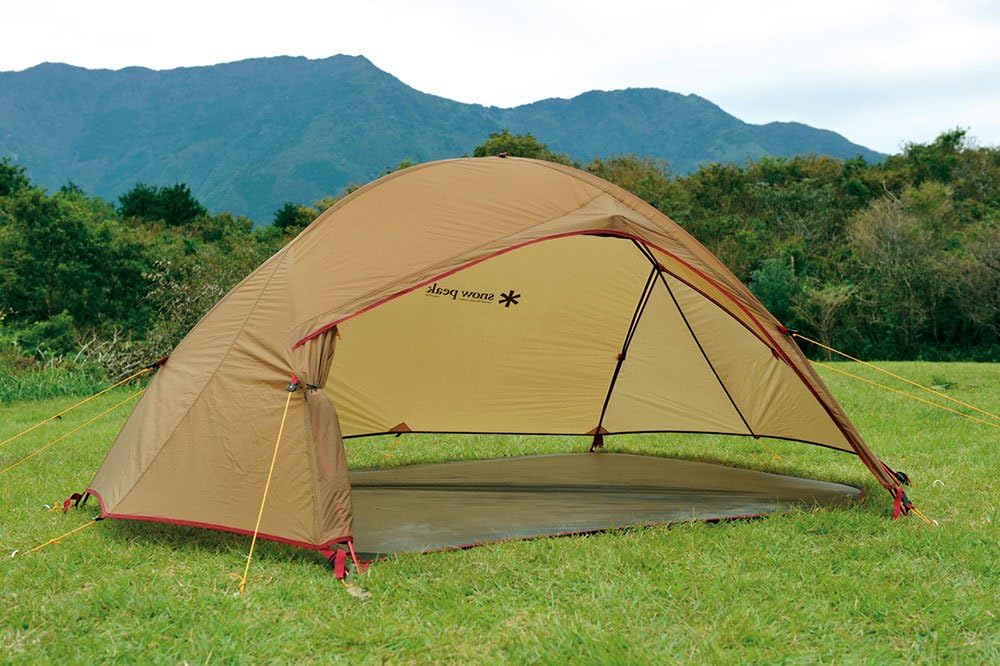
Image: Tent configured as a shelter, without the inner tent.
5. 사용 설명서
- 통풍: The tent features mesh panels and vents to ensure airflow and reduce condensation. Open the mesh panels on the inner tent and adjust the flysheet vents as needed.
- 진입 및 종료: Use the zippers on the inner tent and flysheet doors for entry and exit. Always close zippers completely to prevent insects or weather from entering.
- 내부 저장소: Utilize the mesh pockets inside the inner tent for storing small personal items.
- Lantern Hanging: A loop is provided inside the tent for hanging a lantern or small light source.

Image: Detail of the tent's mesh panel for ventilation.

Image: Convenient mesh pocket inside the inner tent.

Image: Loop for hanging a lantern inside the tent.
6. 유지관리
- 청소: Clean the tent with a soft brush or sponge and mild soap. Hand wash only. Do not use harsh detergents or put in a washing machine. Rinse thoroughly with water.
- 건조: Ensure the tent is completely dry before packing it away. Storing a damp 텐트 내부는 곰팡이가 생기고 원단이 손상될 수 있습니다. 그늘지고 통풍이 잘 되는 곳에서 자연 건조하십시오.
- 저장: Fold the tent neatly and store it in its carry bag in a cool, dry place, away from direct sunlight and extreme temperatures.
- 솔기 밀봉: Periodically inspect the seams. If necessary, apply the provided seam grip agent to maintain waterproofing.
7. 문제 해결
- 응축: Condensation is natural in tents. To minimize it, ensure proper ventilation by opening mesh panels and vents. Avoid cooking or bringing wet items inside.
- 기둥 손상: If a tent pole breaks or splinters, use the included repair pipe to temporarily fix it. Slide the repair pipe over the broken section and secure it with tape.
- 누수: Check for any tears or holes in the fabric. Ensure all seams are properly sealed. Reapply seam grip agent if necessary.
- 설치에 어려움이 있습니다: Ensure poles are correctly assembled and inserted into the designated grommets and clips. Refer to the setup instructions and diagrams.
8. 사양
| 상표 | 스노우 피크 |
| 모델 번호 | SD-210 |
| 제품 무게 | 2.5 kg (including frame, pegs, ropes) |
| 권장 사용 | Camp잉 & 하이킹 |
| 모양 | 둥근 천장 |
| 점유 | 2명 |
| 계절 | 4-season |
| 방수 기술 | Flysheet: 30D nylon ripstop PU coating (min. 1,500mm water pressure resistance), Teflon water repellent finish. Bottom: 40D nylon ripstop PU coating (min. 1,800mm water pressure resistance). Seam grip agent included. |
| 특별 기능 | UV protection, Freestanding design |
| 폐쇄 유형 | 지퍼 |
| 객실 수 | 1 |
| 색상 | 베이지색 |
| 재료 | 나일론, 폴리우레탄 |
| 제품 관리 지침 | 손세탁 |
| 극재 종류 | Super duralumin A7071 (diameter 8.5mm) |
| 텐트 바닥재 | 40D Nylon ripstop (PU coating) |
| 방수포 소재 | 30D Nylon ripstop |
| Storage Case Size | Diameter 15 x 57 cm |

이미지: 이상view of tent materials.
9. 보증 및 지원
Snow Peak products are designed to function reliably in the field and to be used for a long time. We do not include any warranty cards with our products because we believe it is natural for a manufacturer to take responsibility for the quality of its own products.
If the functionality of your purchased product is compromised, please contact Snow Peak User Service or bring it to a dealer. If the cause is a manufacturing defect, we will repair or replace it free of charge. In other cases, we will repair it at a reasonable cost.
Please note that in cases of material deterioration due to age or severe damage from use, which constitute the product's lifespan, repair may not be possible. Always read the instruction manual before using the product. If you have any further questions, product malfunctions during use, or any doubts, please feel free to consult Snow Peak User Service or your dealer.
For support, please visit the official Snow Peak web사이트를 방문하거나 고객 서비스에 직접 문의하세요.