소개
구매해주셔서 감사합니다asing the Edifier Tick Tock Retro Multifunctional Alarm Clock. This device combines a retro design with modern functionality, offering an alarm clock, FM radio, and media playback from SD cards, USB drives, and auxiliary input. This manual provides detailed instructions for setup, operation, and maintenance to ensure optimal performance and longevity of your device.
제품 특징
- SD card reader and USB input port for media playback.
- LCD display screen for time, date, alarm status, and input mode (SD/USB/FM/AUX).
- Alarm clock function with customizable audio sources: SD card, USB drive, FM radio, or Auxiliary input.
- Auxiliary 3.5mm input jack for connecting external audio devices.
- FM radio function with 24 preset channels for easy access to your favorite stations.
- Two 360° omni-directional full-range speakers for rich, multi-directional sound.
컨트롤 및 포트
후면 패널 포트
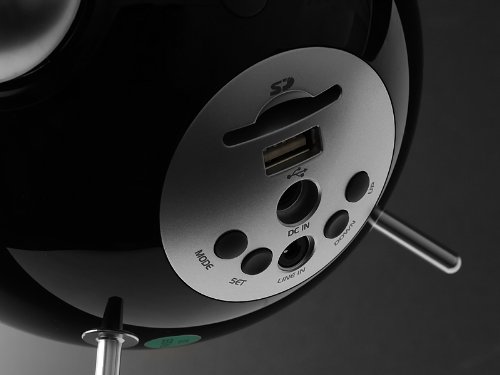
This image displays the rear panel of the Edifier Tick Tock alarm clock. Visible ports and buttons include:
- SD 카드 슬롯: Insert an SD card for music playback.
- USB 포트: 음악 재생을 위해 USB 플래시 드라이브를 연결하세요.
- DC 입력 : 동봉된 AC 어댑터의 전원 입력부입니다.
- 라인 입력(AUX): 외부 기기 연결을 위한 3.5mm 오디오 입력 단자.
- MODE 버튼: Cycles through input modes (SD, USB, FM, AUX).
- 설정 버튼: Used for entering settings menus (e.g., time, alarm).
- 위/아래 버튼: Navigate menus, adjust volume, or change settings.
상단 패널 컨트롤

This image shows the top panel controls of the Edifier Tick Tock alarm clock. These include:
- 재생/일시 정지 버튼: 미디어 재생을 시작하거나 일시 중지합니다.
- 이전/다음 트랙 버튼: Skips to the previous or next track during media playback. Also used for tuning FM radio.
- 볼륨 크게 / 작게 버튼 : 오디오 출력 볼륨을 조절합니다.
- 스누즈/조명 버튼: 알람 중 스누즈 기능을 활성화하거나 화면 밝기를 조절합니다.
설정
- 짐 풀기: Carefully remove the alarm clock and all accessories from the packaging. Ensure all components are present: the alarm clock unit, AC power adapter, and this user manual.
- 전원 연결: Connect the AC power adapter to the "DC IN" port on the rear of the alarm clock. Plug the adapter into a standard wall outlet. The display should illuminate.
- 초기 전원 켜기: The unit should power on automatically. If not, press the power button (if available, otherwise it's always on when plugged in).
- Antenna (FM Radio): Extend the FM antenna located at the back of the unit for optimal radio reception.
작동 지침
시간 및 날짜 설정
- 를 누르고 계세요 세트 시간 표시가 깜빡이기 시작할 때까지 버튼을 누르세요.
- 사용하세요 UP 그리고 아래에 시간을 조정하려면 버튼을 누르세요. 세트 확인하고 회의록으로 이동합니다.
- 분을 조정하세요 UP 그리고 아래에. 누르다 세트 확인합니다.
- Continue this process to set the year, month, and day. Press 세트 to exit the time/date setting mode.
알람 설정
- 를 누르세요 세트 버튼을 한 번만 누르면(길게 누르지 마세요) 알람 설정 모드로 들어갑니다. 알람 시간이 깜빡입니다.
- 사용하세요 UP 그리고 아래에 알람 시간을 조정하려면 버튼을 누르세요. 세트 확인하고 회의록으로 이동합니다.
- 분을 조정하세요 UP 그리고 아래에. 누르다 세트 확인합니다.
- Next, select the alarm source (FM, SD, USB, AUX). Use UP 그리고 아래에 to cycle through options. Press 세트 확인합니다.
- If FM is selected, use UP 그리고 아래에 to select a preset FM station (P01-P24).
- If SD or USB is selected, ensure a card/drive with audio is inserted. The alarm will play the first track.
- If AUX is selected, ensure an external device is connected and playing audio.
- 누르다 세트 알람을 작동시키려면 다시 누르십시오. 디스플레이에 알람 아이콘이 나타납니다.
- To deactivate the alarm, press 세트 알람 아이콘이 사라질 때까지.
- 알람이 울리면 버튼을 누르세요. 스누즈 / 라이트 button to activate snooze (typically 9 minutes). To turn off the alarm completely, press any other button.
FM 라디오 작동
- 를 누르세요 방법 "FM"이 디스플레이에 나타날 때까지 버튼을 반복해서 누릅니다.
- Auto Scan and Preset: 를 누르고 계세요 재생/일시정지 button. The radio will automatically scan for available stations and save them to presets (P01-P24).
- 수동 조정 : 사용하세요 이전/다음 트랙 주파수를 미세하게 조정하는 버튼입니다.
- 사전 설정 선택: FM 모드에서 짧게 누르세요 이전/다음 트랙 저장된 방송국 프리셋을 순환하는 버튼입니다.
- 다음을 사용하여 볼륨 조절 UP 그리고 아래에 buttons on the rear panel.
SD Card / USB Playback
- Insert an SD card into the SD card slot or a USB flash drive into the USB port on the rear panel.
- 를 누르세요 방법 button repeatedly until "SD" or "USB" appears on the display. The device will automatically start playing audio files.
- 사용하세요 재생/일시정지 버튼을 눌러 재생을 일시 중지하거나 다시 시작합니다.
- 사용하세요 이전/다음 트랙 buttons on the top panel to skip tracks.
- 다음을 사용하여 볼륨 조절 UP 그리고 아래에 buttons on the rear panel.
Auxiliary Input (LINE IN)
- Connect an external audio device (e.g., smartphone, MP3 player) to the "LINE IN" (3.5mm) port on the rear panel using an audio cable (not included).
- 를 누르세요 방법 화면에 "AUX"가 나타날 때까지 버튼을 반복해서 누르십시오.
- 연결된 외부 기기에서 재생을 시작하세요.
- 다음을 사용하여 볼륨 조절 UP 그리고 아래에 buttons on the rear panel, and also control volume from your external device.
디스플레이 밝기
짧게 누르세요 스누즈 / 라이트 button on the top panel to cycle through different display brightness levels.
유지
- 청소: Use a soft, dry cloth to clean the surface of the alarm clock. Do not use abrasive cleaners, waxes, or solvents.
- 놓기: Place the unit on a stable, flat surface. Avoid direct sunlight, high temperatures, humidity, or dusty environments.
- 힘: 장기간 사용하지 않을 경우 전원 어댑터를 벽면 콘센트에서 분리하십시오.
문제 해결
| 문제 | 가능한 원인 / 해결책 |
|---|---|
| 전원 없음 / 디스플레이 꺼짐 |
|
| 스피커에서 소리가 나지 않음 |
|
| FM 라디오 수신 불량 |
|
| Alarm does not sound or plays static |
|
| Display is too bright at night |
|
명세서
| 상표 | 에디파이어 |
| 모델 번호 | MF240Reto |
| 디스플레이 유형 | 액정표시장치 |
| 연결 기술 | 보조, USB |
| 특별 기능 | Alarm, Radio, SD Card Reader, USB Playback |
| 전원 | 코드식 전기 |
| 재료 | 플라스틱 |
| 품목 무게 | 0.74파운드(약 0.34kg) |
| 제조업체 | Edifier USA |
보증 및 지원
This Edifier product comes with a 2년 제조사 보증. For warranty claims, technical support, or further assistance, please contact Edifier USA customer service. Please retain your proof of purchase for warranty validation.
최신 지원 정보는 Edifier 공식 웹사이트를 방문하세요. web대지.