
소개
This manual provides detailed instructions for the installation, operation, and maintenance of your Zmodo PKD-DK4216-500GB H.264 4-Channel DVR System. This system is designed for security surveillance, offering remote access capabilities and night vision cameras. Please read this manual thoroughly before using the product to ensure proper setup and functionality.
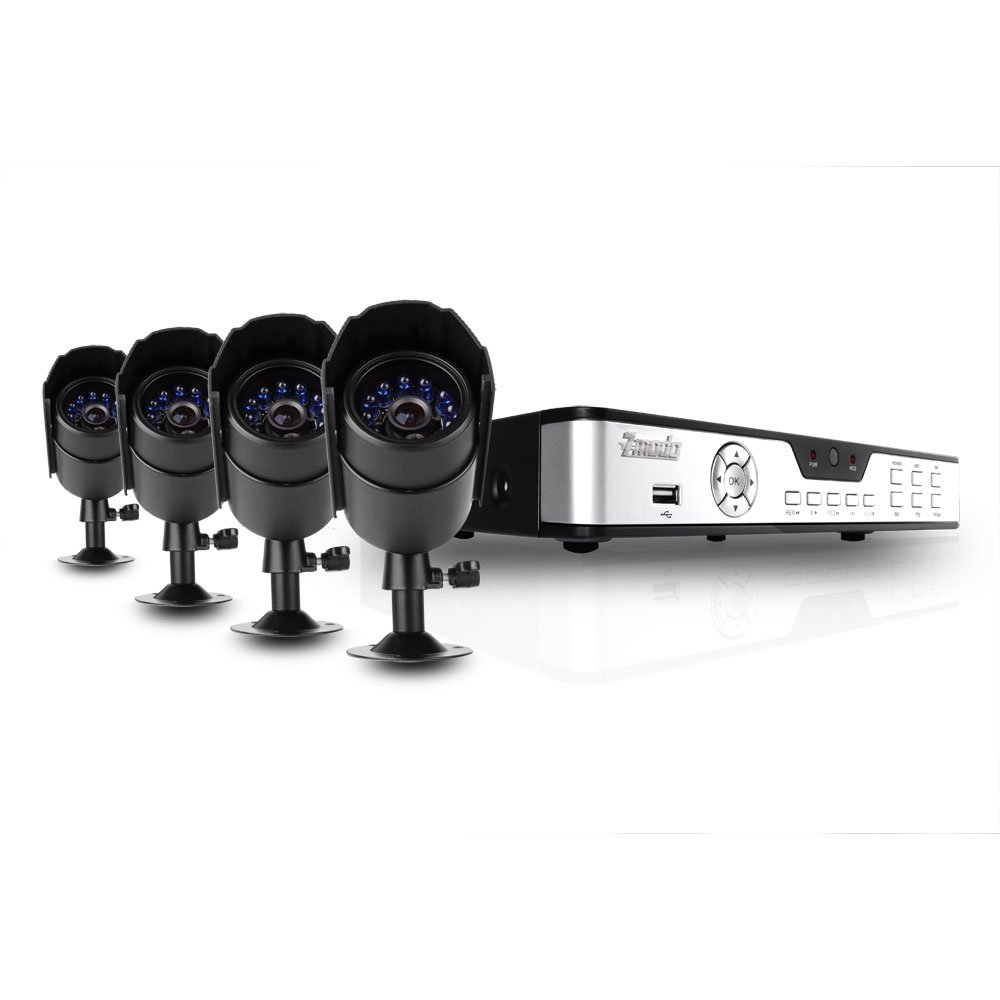
Figure 1: Zmodo PKD-DK4216-500GB DVR System components, including the DVR unit, four night vision cameras, power adapters, cables, a USB mouse, and a remote control.
설정 및 설치
1. 포장해체 및 구성품 확인
모든 구성품을 조심스럽게 풀어서 다음 품목이 포함되어 있는지 확인하세요.
- 1 x Zmodo 4-Channel DVR Unit with 500GB Hard Drive
- 4 x Night Vision Security Cameras
- 4 x Camera Power/Video Cables (60ft each)
- DVR 전원 어댑터 1개
- 1 x Camera Power Splitter
- 1 x USB 마우스
- 1 x 원격 제어
- 1 x 사용자 매뉴얼(이 문서)
2. DVR 연결
Before powering on the DVR, connect all necessary peripherals.
- 모니터를 연결하세요: Use a VGA or BNC cable to connect your monitor to the corresponding port on the DVR's rear panel.
- 마우스 연결: USB 마우스를 DVR의 USB 포트(앞면 또는 뒷면) 중 하나에 연결하세요.
- 카메라 연결: Connect each camera's video cable (BNC connector) to an available video input port on the DVR's rear panel.
- Connect Camera Power: Use the camera power splitter to connect all four cameras to a single power adapter. Plug the power adapter into an electrical outlet.
- DVR 전원 연결: Plug the DVR power adapter into the DVR and then into an electrical outlet. The DVR should power on automatically.
- 네트워크 연결(선택 사항): 원격용 viewing, connect an Ethernet cable from your router to the LAN port on the DVR's rear panel.
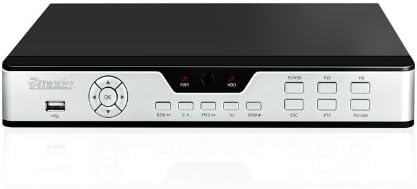
Figure 2: Front panel of the DVR, showing the USB port, navigation buttons, and status indicators.

Figure 3: Rear panel of the DVR, displaying BNC video inputs, VGA output, audio inputs/outputs, LAN port, and power input.
3. 카메라 설치
Mount the cameras in desired locations, ensuring a clear field of view and protection from direct weather exposure. The cameras are designed for both indoor and outdoor use and feature night vision capabilities.
- Securely mount each camera using the provided hardware.
- 원하는 감시 영역을 커버할 수 있도록 카메라 각도를 조정하십시오.
- Route the camera cables to the DVR, ensuring they are protected from damage and moisture.

그림 4: 전면 view of a Zmodo camera, showing the lens and infrared (IR) LEDs for night vision.

그림 5: 측면 view of a Zmodo camera, illustrating its bullet design and adjustable mounting bracket.
4. DVR 초기 설정
Upon first power-up, the DVR will guide you through initial setup steps, including setting the date, time, and administrator password. Follow the on-screen prompts using the USB mouse.
작동 지침
1. 기본 탐색
The DVR interface is primarily controlled using the USB mouse. Right-click to access the main menu, and left-click to select options and navigate through menus.
2. 녹음 모드
DVR은 다양한 녹화 모드를 지원합니다.
- 연속 녹화 : 24시간 내내 기록합니다.
- 모션 감지 녹화: 카메라에서 움직임이 감지될 때만 녹화합니다. view이렇게 하면 하드 드라이브 공간을 절약할 수 있습니다.
- 예약 녹화 : 하루 중 또는 주 중 특정 시간대의 기록입니다.
Configure recording settings for each camera through the DVR's main menu under 'Record Settings'.
3. 비디오 재생
다시view 기록된 footage:
- 메인 메뉴에서 '재생'을 선택하세요.
- 원하는 날짜와 카메라 채널을 선택하세요.
- Use the timeline to navigate through recordings. Motion-triggered events are often marked for easier identification.
4. Remote Access (Internet & 3G Phone)
DVR은 원격 제어를 지원합니다. viewing via Internet Explorer on a PC or through dedicated applications on 3G-enabled smartphones (Blackberry, Android, iPhone, iPad).
- 네트워크 구성: Ensure the DVR is connected to your router via Ethernet. You may need to configure port forwarding on your router and set up a Dynamic DNS (DDNS) service if you do not have a static IP address. Refer to your router's manual and Zmodo's online support for detailed network setup instructions.
- PC 접속: Open Internet Explorer and enter the DVR's IP address. You may be prompted to install an ActiveX control.
- 모바일 접속: Download the appropriate Zmodo application from your smartphone's app store. Follow the in-app instructions to add your DVR using its IP address or DDNS hostname.
유지
1. 하드 드라이브 관리
The 500GB hard drive will automatically overwrite the oldest recordings when full. Regularly back up important footage to an external USB drive if needed. You can configure hard drive settings and format the drive through the DVR's system menu.
2. 청소
Periodically clean the camera lenses and the DVR unit with a soft, dry cloth. Avoid using harsh chemicals or abrasive materials that could damage surfaces.
3. 펌웨어 업데이트
Check the Zmodo official website for any available firmware updates for your DVR model. Firmware updates can improve performance, add features, or fix bugs. Follow the instructions provided with the update carefully.
문제 해결
- 모니터에 아무것도 표시되지 않음:
- Ensure the monitor is powered on and correctly connected to the DVR's VGA or BNC output. Verify the DVR is powered on and its power adapter is securely connected.
- Cameras not displaying video:
- Check that all camera power and video cables are securely connected to both the cameras and the DVR. Ensure the camera power adapter is functioning.
- 원격 접속이 작동하지 않습니다.
- Verify the DVR is connected to your network. Check your router's port forwarding settings and DDNS configuration. For PC access, ensure ActiveX controls are enabled in Internet Explorer. Consult Zmodo's online support for detailed network troubleshooting guides.
- 야간 시야 품질이 좋지 않음:
- Ensure there are no obstructions directly in front of the camera lens that could reflect the infrared light. The effective night vision range is up to 50 feet; objects beyond this distance may appear less clear.
- DVR이 녹화 중이 아닙니다.
- Check recording schedules and motion detection settings. Verify the hard drive status in the DVR's system menu. Ensure the hard drive is not full (though it should overwrite automatically).
제품 사양
| 상표 | 즈모도 |
| 모델 번호 | PKD-DK4216-500GB |
| 연결 기술 | 열광한 |
| 채널 수 | 4 |
| 메모리 저장 용량 | 500 GB (Hard Drive Installed) |
| 전원 | 코드식 전기 |
| 품목 치수(L x W x H) | 17.13 x 11.14 x 6.85 인치 |
| 운영 체제(호환 가능) | 안드로이드(모바일 앱용) |
| 호환 장치 | 스마트폰 |
| 저조도 기술 | 예 |
| 나이트 비전 범위 | 50 피트 |
| 프레임 속도 | 30프레임 |
| 녹화 모드 | 연속 동작 감지 |
| 총 USB 포트 | 1 |
| 하드웨어 인터페이스 | Ethernet, BNC, VGA |
보증 정보
This Zmodo product is covered by a manufacturer's warranty. For specific details regarding warranty duration, coverage, and claims procedures, please refer to the warranty card included with your product or visit the official Zmodo web사이트. 구매 증빙 자료로 구매 영수증을 보관하세요.
고객 지원
For technical assistance, troubleshooting, or further inquiries, please contact Zmodo customer support through their official website. Online resources, FAQs, and support forums may also be available to help resolve common issues.
Zmodo Official Web대지: www.zmodo.com