
1. 서론
구매해주셔서 감사합니다asing the Caliber RMD 068-2 Car Radio USB/SD Player. This manual provides detailed instructions for the installation, operation, and maintenance of your new car radio. Please read this manual thoroughly before using the product to ensure proper functionality and safety. Keep this manual for future reference.
2. 안전 정보
- 설치: Ensure the unit is installed by a qualified technician to prevent damage to the vehicle's electrical system. Incorrect wiring can cause fire or electrical shock.
- 전원 공급 장치: 본 기기는 음극 접지 방식의 12V DC 자동차 배터리에만 연결하십시오.
- 퓨즈 : Always replace fuses with new ones of the specified rating. Using an incorrect fuse can cause damage to the unit or vehicle.
- 볼륨 레벨: Do not operate the unit at excessively high volume levels, as this may impair your ability to hear external traffic sounds and could be dangerous.
- 청소: 세척에는 부드럽고 마른 천을 사용하십시오. 연마성 세척제나 용매를 사용하지 마십시오.
- 수분: 기기를 습기나 물에 노출시키지 마십시오.
3. 패키지 내용
모든 항목이 있는지 확인하세요.
- Caliber RMD 068-2 Car Radio Unit
- 탈착식 전면 패널
- ISO 배선 하네스
- 장착 프레임
- 분해 키 (2개)
- 사용 설명서 (본 문서)
4. 제품 오버view
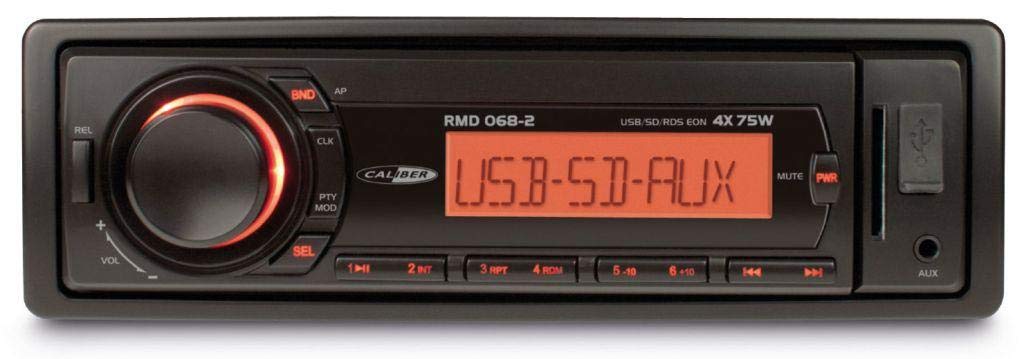
그림 1: 전면 view of the Caliber RMD 068-2 Car Radio. This image shows the main unit with its detachable front panel, including the display, control buttons, USB port, and SD card slot.
4.1 전면 패널 컨트롤
- 전원/모드 버튼: Press to turn on/off. Short press to switch between Radio, USB, SD, AUX modes.
- 볼륨 노브: Rotate to adjust volume. Press to access audio settings (Bass, Treble, Balance, Fader).
- 디스플레이: Shows current time, radio frequency, track information, etc.
- USB 포트: 미디어 재생을 위해 USB 플래시 드라이브를 연결하세요.
- SD 카드 슬롯: 미디어 재생을 위해 SD 카드를 삽입하세요.
- AUX 입력 (3.5mm 잭): 외부 오디오 장치를 연결합니다.
- BAND/AMS Button: In radio mode, press to select radio band (FM1, FM2, FM3). Long press for Automatic Memory Store.
- 프리셋 버튼(1-6): Store and recall radio stations. In USB/SD mode, use for direct track selection.
- 재생/일시정지 버튼: 미디어 재생을 재생하거나 일시 정지합니다.
- FORWARD/BACKWARD Buttons: 트랙을 건너뛰거나 라디오 주파수를 조정하세요.
- 배출 버튼: Release the detachable front panel.
4.2 후면 연결
The rear of the unit features standard ISO connectors for power and speakers, along with an antenna input.
- ISO Power Connector: For connecting to the vehicle's power supply (constant 12V, ignition 12V, ground).
- ISO Speaker Connector: For connecting to the vehicle's speakers (Front Left, Front Right, Rear Left, Rear Right).
- 안테나 입력: 차량용 라디오 안테나 연결용입니다.
5. 설정
5.1 설치
- 배터리 분리: Before starting, disconnect the negative terminal of your car battery to prevent short circuits.
- 오래된 장치 제거: 차량 대시보드에서 기존 라디오를 조심스럽게 분리하세요.
- 장착 프레임을 설치하세요: Insert the supplied mounting frame into the dashboard opening and bend the tabs to secure it.
- 배선 연결: Refer to the wiring diagram in section 5.2. Connect the ISO wiring harness to the car's wiring and then to the Caliber RMD 068-2 unit. Connect the antenna cable.
- Slide Unit In: Carefully slide the Caliber RMD 068-2 unit into the mounting frame until it clicks into place.
- 배터리를 다시 연결하십시오: 자동차 배터리의 음극 단자를 다시 연결하세요.
- 전면 패널 부착: 분리형 전면 패널을 본체에 부착합니다.
5.2 배선도
The Caliber RMD 068-2 uses standard ISO connectors. Ensure correct connections as shown below. If your vehicle does not have ISO connectors, an adapter may be required.
| 핀 번호 | 전선 색상 (일반적) | 기능 |
|---|---|---|
| 4 | 노란색 | 12V(배터리) |
| 7 | 빨간색 | 12V 전환(점화) |
| 8 | 검은색 | 지면 |
| 5 | 파란색 | Antenna Remote Out |
| 핀 번호 | 전선 색상 (일반적) | 기능 |
|---|---|---|
| 1 | 보라 | 후면 우측(+) |
| 2 | 보라색/검정색 | 뒤 오른쪽(-) |
| 3 | 녹색 | 후면 왼쪽(+) |
| 4 | 녹색/검정색 | 후면 왼쪽(-) |
| 5 | 회색 | 전면 우측(+) |
| 6 | 회색/검정색 | 전면 우측(-) |
| 7 | 하얀색 | 전면 왼쪽(+) |
| 8 | 흰색/검정색 | 전면 좌측(-) |
Note: Wire colors may vary depending on vehicle manufacturer. Always consult your vehicle's wiring diagram.
6. 사용 설명서
6.1 기본 기능
- 전원 켜기/끄기: 를 누르세요 전원 / 모드 버튼을 눌러 장치를 켜거나 끕니다.
- 볼륨 조절: 회전하다 용량 볼륨을 높이려면 손잡이를 시계 방향으로 돌리고, 볼륨을 낮추려면 시계 반대 방향으로 돌리세요.
- 모드 선택: 짧게 누르세요 전원 / 모드 button to cycle through available modes: Radio (FM), USB, SD, AUX.
- 오디오 설정: 를 누르세요 용량 knob to enter audio settings. Rotate the knob to select settings like BASS, TREBLE, BALANCE, FADER. Press the knob again to confirm or move to the next setting.
6.2 무선 작동
- 밴드 선택: 라디오 모드에서는 다음을 누릅니다. 밴드/AMS FM1, FM2, FM3 대역을 전환하는 버튼입니다.
- 수동 조정 : 짧게 누르세요 앞으로 뒤로 주파수를 미세하게 조정하는 버튼입니다.
- 자동 검색 : 길게 누르세요 앞으로 뒤로 다음으로 신호가 강한 방송국을 자동으로 검색하는 버튼입니다.
- 사전 설정 저장: Tune to your desired station. Long press one of the PRESET (1-6) buttons until you hear a beep. The station is now stored.
- 프리셋 불러오기: Short press one of the PRESET (1-6) buttons to recall a stored station.
- Automatic Memory Store (AMS): 길게 누르세요 밴드/AMS button to automatically scan and store the strongest stations into the current band's presets.
6.3 USB/SD 재생
- 미디어 삽입: USB 포트에 USB 플래시 드라이브를 삽입하거나 SD 카드 슬롯에 SD 카드를 삽입하십시오. 기기가 자동으로 USB/SD 모드로 전환되어 재생을 시작합니다.
- 재생/일시 중지: 를 누르세요 재생/일시정지 버튼을 눌러 재생을 일시 중지하거나 다시 시작합니다.
- 트랙 건너 뛰기 : 짧게 누르세요 앞으로 뒤로 다음 또는 이전 트랙으로 건너뛰는 버튼입니다.
- 빨리 감기/되감기: 길게 누르세요 앞으로 뒤로 트랙 내에서 빨리 감기 또는 되감기를 할 수 있는 버튼이 있습니다.
- 폴더 탐색: 사용하세요 프리셋 5 그리고 프리셋 6 buttons to navigate between folders on your USB/SD media.
6.4 AUX 입력
- 장치 연결: Connect your external audio device (e.g., smartphone, MP3 player) to the 3.5mm AUX input jack on the front panel using an audio cable.
- AUX 모드를 선택하세요: 를 누르세요 전원 / 모드 button repeatedly until "AUX" is displayed.
- 재생 제어: Control playback (play, pause, skip) directly from your connected external device. The car radio will control the volume.
7. 유지관리
- 장치 청소: Use a soft, dry cloth to wipe the front panel and display. Do not use harsh chemicals, cleaning sprays, or abrasive cloths, as these can damage the surface.
- 분리 가능한 전면 패널: When detaching the front panel, handle it carefully. Store it in a protective case (if supplied) to prevent scratches or damage.
- USB/SD 포트: USB 포트와 SD 카드 슬롯에 먼지와 이물질이 들어가지 않도록 하십시오.
8. 문제 해결
| 문제 | 가능한 원인 | 해결책 |
|---|---|---|
| 전원이 없습니다 | 퓨즈 단선; 잘못된 배선; 연결 불량 | Check and replace fuse; Verify wiring connections (Yellow to constant 12V, Red to ignition 12V, Black to ground); Ensure front panel is securely attached. |
| 소리가 나지 않습니다 | Volume too low; Mute activated; Incorrect speaker wiring; Damaged speakers | 볼륨을 높이세요. 음소거 기능이 활성화되어 있는지 확인하세요. 스피커 연결을 확인하세요. 정상 작동하는 스피커로 테스트해 보세요. |
| 라디오 수신 상태 불량 | Antenna not connected; Damaged antenna; Weak signal area | Ensure antenna is securely connected; Check antenna for damage; Try tuning to a stronger station or move to a different location. |
| USB/SD 카드가 재생되지 않습니다 | 지원되지 않음 file format; Corrupted media; Incorrectly inserted media; Max capacity exceeded | 보장하다 files are MP3/WMA format; Try a different USB/SD card; Reinsert media correctly; Check media capacity (max 32GB recommended). |
| Front panel cannot be detached | Eject button not fully pressed; Mechanism jammed | Press the EJECT button firmly; Do not force the panel. |
If the problem persists after trying these solutions, please contact your dealer or a qualified service center.
9. 사양
- 모델: Caliber RMD 068-2
- 전력 출력: 4 x 75 Watts Max
- 전원 공급 장치: 12V DC (10.8V-15.6V), Negative Ground
- 퓨즈: 10A
- 지원되는 오디오 형식: MP3, WMA (USB/SD 카드 이용)
- USB/SD Compatibility: 최대 32GB(FAT32 포맷)
- FM 튜너 : RDS, 18 Presets
- 보조 입력: 3.5mm 스테레오 잭
- 분리 가능한 전면 패널: 예
- 무게: 약 0.95kg (2.09lbs)
10. 보증 및 지원
This Caliber product is covered by a warranty in accordance with applicable European laws. For detailed warranty terms and conditions, please refer to the warranty card included with your product or visit the official Caliber website. For technical support, troubleshooting assistance, or service inquiries, please contact your authorized Caliber dealer or the customer service department in your region. Please have your product model number (RMD 068-2) and proof of purchase ready when contacting support.
Note: Specifications and design are subject to change without notice for improvement.