
VOLTCRAFT GOS-632 FG
VOLTCRAFT GOS-632 FG Oscilloscope with Frequency Generator User Manual
1. 서론
This manual provides essential information for the safe and efficient operation of your VOLTCRAFT GOS-632 FG Oscilloscope with Frequency Generator. Please read this manual thoroughly before using the device and keep it for future reference. The GOS-632 FG is a 30 MHz dual-channel analog oscilloscope integrated with a frequency generator, designed for various electronic measurement and testing applications.
2. 안전 지침
감전, 부상 또는 기기 손상을 방지하기 위해 항상 다음 안전 수칙을 준수하십시오.
- 전원: 지정된 전압의 전원에만 기기를 연결하십시오.tage와 주파수.
- 접지: 감전을 방지하기 위해 기기가 제대로 접지되었는지 확인하십시오.
- 통풍: Do not block ventilation openings. Ensure adequate airflow to prevent overheating.
- 환경: Operate the oscilloscope in a dry, clean environment, away from direct sunlight, high temperatures, and excessive dust or humidity.
- 프로브 : 볼륨에 대해 정격이 지정된 프로브만 사용하십시오.tage and frequency being measured. Ensure probes are in good condition.
- 서비스: 모든 서비스는 자격을 갖춘 서비스 담당자에게 의뢰하십시오. 기기를 직접 열거나 수리하려고 시도하지 마십시오.
- 액체 접촉: Avoid contact with liquids. If liquid enters the device, disconnect power immediately and have it inspected by a qualified technician.
3. 패키지 내용
Please check the package contents upon receipt. If any items are missing or damaged, contact your dealer immediately.
- VOLTCRAFT GOS-632 FG Oscilloscope with Frequency Generator
- 전원 코드
- Two (2) Oscilloscope Probes (1x/10x switchable)
- 사용 설명서 (본 문서)
4. 제품 오버view
The VOLTCRAFT GOS-632 FG is a robust analog oscilloscope designed for reliable waveform analysis. Below is a general view 장치의.
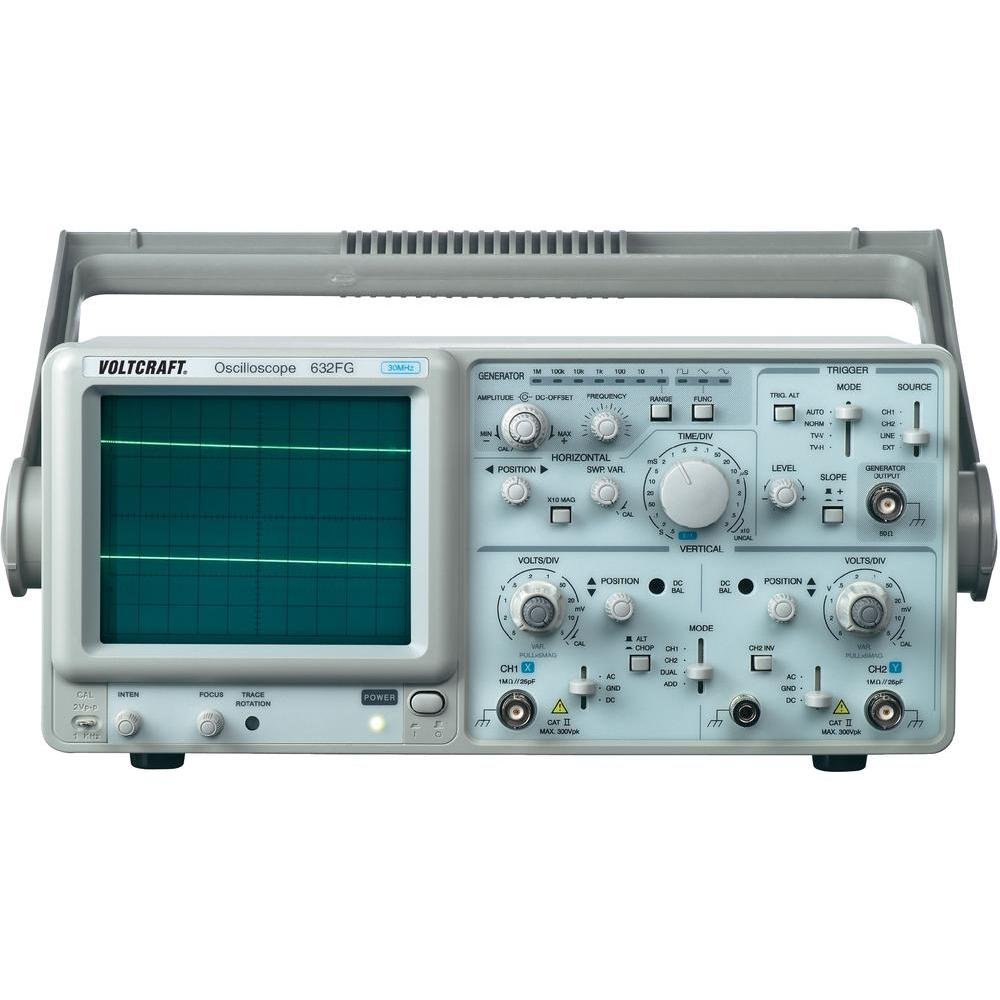
그림 4.1: 앞쪽 view of the VOLTCRAFT GOS-632 FG Oscilloscope. This image shows the main display, control knobs, and input connectors for the two channels and the frequency generator output.
4.1. 전면 패널 컨트롤
- CRT Display: Shows the waveform.
- CH1/CH2 입력: 오실로스코프 프로브 연결용 BNC 커넥터.
- 볼트/분할: Adjusts the vertical sensitivity for each channel.
- 위치: Adjusts the vertical position of the waveform.
- TIME/DIV: Adjusts the horizontal sweep speed.
- TRIGGER LEVEL: 볼륨을 설정tage level at which the sweep starts.
- 오시는 길 : Selects trigger source (CH1, CH2, EXT, LINE).
- FREQUENCY GENERATOR OUTPUT: BNC connector for the integrated signal generator.
- FREQUENCY/AMP리튜드: Controls for the frequency generator output.
- 전원 스위치: 장치를 켜거나 끕니다.
4.2. 후면 패널 연결
- AC 전원 입력: 전원 코드용 커넥터.
- 접지 터미널: For additional grounding if required.
5. 설정
- 짐 풀기: Carefully remove the oscilloscope from its packaging. Retain the packaging for future transport.
- 놓기: 오실로스코프를 안정적이고 평평한 표면에 놓고 주변에 적절한 환기가 이루어지도록 하십시오.
- 전원 연결: Connect the supplied power cord to the AC power input on the rear panel and then to a grounded electrical outlet.
- 프로브 연결: 오실로스코프 프로브를 전면 패널의 CH1 및/또는 CH2 BNC 입력 커넥터에 연결하세요. 단단히 연결되었는지 확인하세요.
- 프로브 보상: Before taking measurements, compensate your probes. Connect the probe tip to the probe compensation output (usually a square wave signal on the front panel) and adjust the probe's compensation trimmer until a flat-top square wave is displayed.
6. 오실로스코프 작동법
6.1. 기본 측정
- 전원 켜기: Press the POWER switch to turn on the oscilloscope. Allow a few minutes for the display to stabilize.
- 입력 신호 : 측정하려는 회로 지점에 프로브를 연결하십시오.
- Vertical Adjustment (VOLTS/DIV & POSITION):
- Select the appropriate VOLTS/DIV setting to display the waveform within the screen.
- Use the POSITION knob to center the waveform vertically.
- Horizontal Adjustment (TIME/DIV & POSITION):
- Select the appropriate TIME/DIV setting to display several cycles of the waveform horizontally.
- Use the horizontal POSITION knob to move the waveform left or right.
- 트리거 설정:
- Set the TRIGGER MODE (e.g., AUTO, NORM).
- Adjust the TRIGGER LEVEL knob until a stable waveform is displayed.
- Select the TRIGGER SOURCE (e.g., CH1, CH2).
6.2. Using the Frequency Generator
- 연결 출력: Connect a BNC cable from the FREQUENCY GENERATOR OUTPUT to the circuit or device under test.
- 빈도 설정: Use the FREQUENCY control to select the desired output frequency.
- 세트 Amp고독 : 사용하세요 AMPLITUDE control to adjust the output signal strength.
- 파형 선택: If available, select the desired waveform type (e.g., sine, square, triangle).
7. 유지관리
- 청소: 청소하기 전에 전원 코드를 뽑으세요. 부드러운 천을 사용하세요.amp cloth with a mild detergent to clean the exterior. Do not use abrasive cleaners or solvents.
- 저장: 장기간 사용하지 않을 때는 오실로스코프를 건조하고 먼지가 없는 환경에 보관하십시오.
- 구경 측정: For accurate measurements, periodic calibration by qualified personnel is recommended.
8. 문제 해결
| 문제 | 가능한 원인 | 해결책 |
|---|---|---|
| 전원을 켠 후 표시되지 않음 | No power, brightness/focus too low | Check power cord, outlet. Adjust INTENSITY and FOCUS knobs. |
| 불안정한 파형 | Incorrect trigger settings, signal too noisy | Adjust TRIGGER LEVEL, TRIGGER MODE, and TRIGGER SOURCE. Check signal integrity. |
| 신호가 표시되지 않습니다 | Probe not connected, incorrect VOLTS/DIV, signal outside range | Ensure probe is connected and making contact. Adjust VOLTS/DIV and POSITION. Check probe compensation. |
| Frequency generator output not working | Output cable not connected, amplitude set to zero | Check output cable connection. Increase AMP리튜드. |
9. 사양
| 특징 | 세부 사항 |
|---|---|
| 모델 번호 | GOS-632 FG |
| 제조업체 | 볼트크래프트 |
| 대역폭 | 30 MHz (DC) |
| 채널 | 2개 아날로그 채널 |
| Integrated Function | 주파수 발생기 |
| 제품 무게 | 9.07 g (Note: This weight seems unusually low for an oscilloscope and might be a data entry error. Refer to product packaging for accurate weight.) |
| ASIN | B003IDBEYM |
| 첫 번째 이용 가능 | 31년 2015월 XNUMX일 |
10. 보증 및 지원
VOLTCRAFT products are designed for quality and reliability. For information regarding warranty terms, technical support, or service, please refer to the warranty card included with your product or visit the official VOLTCRAFT web사이트. 직접 기기를 수리하려고 시도하지 마십시오. 보증이 무효화될 수 있습니다.
For further assistance, please contact your local VOLTCRAFT distributor or customer service center.
Ask a question about this manual
Ask about setup, troubleshooting, compatibility, parts, safety, or missing instructions. Manuals+ will review the question and use this page’s manual context to help answer it.