
1. 서론
Thank you for choosing the Voltcraft VC-11 Digital Multimeter. This portable, Category III, 250V multimeter with a 2000-count display is designed for accurate electrical measurements in various applications. This manual provides essential information for safe operation, proper use, and maintenance of your device. Please read it thoroughly before use and keep it for future reference.
2. 안전 정보
WARNING: Electrical shock hazard. Improper use of this meter can cause damage, shock, injury, or death. Read and understand this manual before operating the meter.
- Always ensure the meter is in good working condition and the test leads are not damaged.
- 정격용량 이상을 적용하지 마십시오.tage는 계량기에 표시된 대로 단자 사이 또는 단자와 접지 사이의 전압입니다.
- vol로 작업할 때 각별히 주의하십시오.tages above 25V AC RMS or 35V DC. These voltag이것은 충격 위험을 초래합니다.
- 기능이나 범위를 변경하기 전에 항상 회로에서 테스트 리드를 분리하세요.
- Do not operate the meter with the battery cover removed or loosened.
- Adhere to local and national safety codes. Use personal protective equipment (PPE) such as approved safety glasses and electrically insulated gloves.
3. 제품 오버view
The Voltcraft VC-11 is a compact digital multimeter featuring a clear LCD display, a rotary function switch, and input jacks for test leads. It is designed for measuring DC/AC voltage, DC current, resistance, and includes diode and continuity test functions.
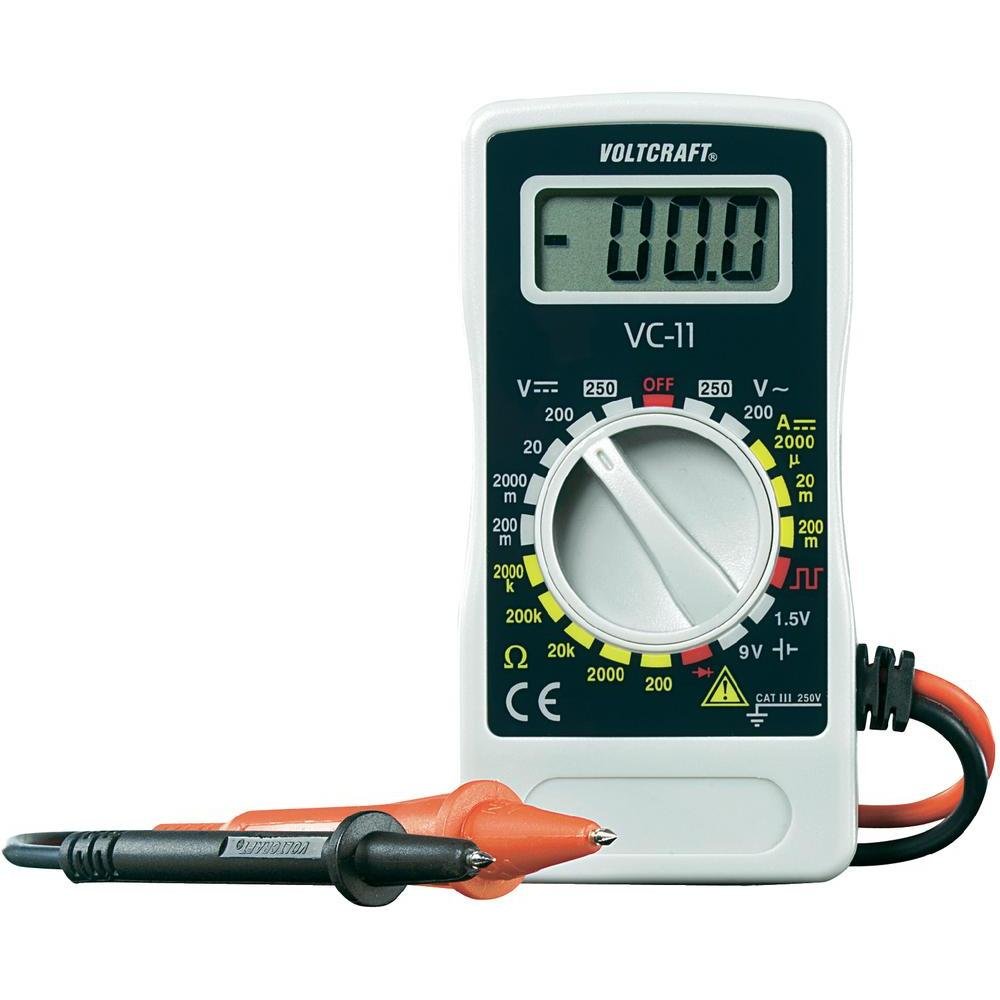
그림 1: 전면 view of the Voltcraft VC-11 Digital Multimeter with test leads connected. This image shows the LCD display, rotary switch, and input terminals.

그림 2: 각도 view of the Voltcraft VC-11 Digital Multimeter, highlighting the compact design and the CE marking.

Figure 3: The Voltcraft VC-11 Digital Multimeter shown with its test leads detached, illustrating the input ports.
3.1개의 구성요소
- LCD 디스플레이: 측정값, 단위, 기능 표시기를 보여줍니다.
- 로터리 스위치: 측정 기능 및 범위를 선택하는 데 사용됩니다.
- 입력 잭: Ports for connecting the test leads (COM, VΩmA).
- 테스트 리드: Red and black leads for connecting to the circuit under test.
4. 설정
4.1 배터리 설치
The Voltcraft VC-11 requires a 9V battery for operation (not included). To install or replace the battery:
- 멀티미터의 전원이 꺼져 있는지 확인하고 모든 테스트 리드를 분리하십시오.
- 측정기 뒷면에서 배터리 덮개를 찾으세요.
- 드라이버를 사용하여 배터리 덮개를 고정하는 나사를 제거합니다.
- 덮개를 조심스럽게 제거하십시오.
- 새 9V 배터리를 배터리 클립에 연결할 때 극성을 올바르게 확인하십시오.
- 배터리를 수납공간에 넣고 덮개를 덮은 후 나사로 고정합니다.
4.2 테스트 리드 연결
Always connect the black test lead to the 'COM' (common) jack. Connect the red test lead to the appropriate input jack based on the desired measurement:
- 볼륨tage (V), Resistance (Ω), Diode, and Continuity measurements, connect the red lead to the 'VΩmA' jack.
- For Current (A) measurements, connect the red lead to the 'VΩmA' jack (for mA range).
5. 사용 설명서
측정을 시작하기 전에 테스트 리드가 올바르게 연결되었는지, 회전 스위치가 원하는 기능 및 범위로 설정되어 있는지 확인하십시오.
5.1 DC Vol 측정tage (V=)
- 회전 스위치를 원하는 DC Vol로 설정하세요.tage (V=) range (e.g., 200mV, 2V, 20V, 200V, 250V). If the voltage가 알려지지 않은 경우 가장 높은 범위에서 시작하여 필요에 따라 낮추세요.
- 검은색 테스트 리드를 'COM' 잭에 연결하고 빨간색 테스트 리드를 'VΩmA' 잭에 연결하십시오.
- 측정할 부품이나 회로에 테스트 프로브를 병렬로 연결하십시오.
- vol을 읽어보세요tagLCD 디스플레이의 e 값.
5.2 AC Vol 측정tag전자(V~)
- 회전 스위치를 원하는 AC Vol로 설정하세요.tage (V~) 범위 (예: 200V, 250V).
- 검은색 테스트 리드를 'COM' 잭에 연결하고 빨간색 테스트 리드를 'VΩmA' 잭에 연결하십시오.
- 테스트 프로브를 AC 전원 또는 구성 요소에 병렬로 연결하십시오.
- vol을 읽어보세요tagLCD 디스플레이의 e 값.
5.3 직류 전류 측정 (A=)
- Set the rotary switch to the desired DC Current (A=) range (e.g., 2000µA, 20mA, 200mA).
- 검은색 테스트 리드를 'COM' 잭에 연결하고 빨간색 테스트 리드를 'VΩmA' 잭에 연결하십시오.
- 경고: To measure current, the meter must be connected in series with the circuit. Break the circuit and insert the meter.
- 테스트 프로브를 회로에 직렬로 연결하십시오.
- LCD 디스플레이의 현재 값을 읽습니다.
5.4 저항 측정 (Ω)
- 저항을 측정하기 전에 회로의 전원이 차단되었는지 확인하십시오.
- Set the rotary switch to the desired Resistance (Ω) range (e.g., 200Ω, 2kΩ, 20kΩ, 200kΩ, 2000kΩ).
- 검은색 테스트 리드를 'COM' 잭에 연결하고 빨간색 테스트 리드를 'VΩmA' 잭에 연결하십시오.
- 측정할 부품에 테스트 프로브를 연결하십시오.
- LCD 디스플레이에서 저항값을 읽으세요.
5.5 다이오드 테스트
- 회로의 전원이 꺼졌는지 확인하세요.
- Set the rotary switch to the Diode symbol (usually next to resistance).
- 검은색 테스트 리드를 'COM' 잭에 연결하고 빨간색 테스트 리드를 'VΩmA' 잭에 연결하십시오.
- 빨간색 프로브를 다이오드의 애노드에, 검은색 프로브를 캐소드에 연결하십시오. 디스플레이에 순방향 전압이 표시됩니다.tag전자 드롭.
- 프로브를 반대로 연결하십시오. 다이오드가 정상인 경우 디스플레이에 'OL'(과부하)이 표시되어야 합니다.
5.6 연속성 테스트
- 회로의 전원이 꺼졌는지 확인하세요.
- Set the rotary switch to the Continuity symbol (usually next to diode/resistance).
- 검은색 테스트 리드를 'COM' 잭에 연결하고 빨간색 테스트 리드를 'VΩmA' 잭에 연결하십시오.
- 테스트 프로브를 회로 또는 부품에 연결하십시오.
- If the resistance is below a certain threshold (typically 30-50Ω), the meter will emit an audible beep, indicating continuity.
6. 유지관리
6.1 청소
광고로 미터를 닦으세요amp 천과 순한 세제를 사용하여 닦아주세요. 연마제나 용제는 사용하지 마세요. 사용 전 측정기가 완전히 건조되었는지 확인하세요.
6.2 배터리 교체
When the battery symbol appears on the LCD display, the 9V battery needs to be replaced. Refer to section 4.1 for battery installation instructions.
7. 문제 해결
| 문제 | 가능한 원인 | 해결책 |
|---|---|---|
| 디스플레이가 없거나 어둡습니다 | 배터리가 방전되었거나 배터리가 부족합니다 | 9V 배터리를 교체하십시오. |
| 잘못된 판독 | 잘못된 기능/범위가 선택되었습니다. Poor test lead connection 손상된 테스트 리드 | Select the correct function and range. Ensure test leads are firmly connected. Inspect and replace damaged test leads. |
| "OL"(과부하) 표시 | 측정값이 선택된 범위를 벗어났습니다. Open circuit (for resistance/current) | Select a higher range. Check for breaks in the circuit. |
8. 사양
- 상표: 볼트크래프트
- 모델 번호: VC11
- 제조업체: 볼트크래프트
- 제품 무게: Approximately 9.07 g (without packaging)
- 패키지 크기: 14.8 x 8 x 3.6cm
- 카테고리 등급: CATⅢ 250V
- 표시하다: 2000 카운트
- 전원: 9V 배터리(별도 구매)
9. 보증 정보
This product is covered by a standard manufacturer's warranty. Please refer to the warranty card included with your purchase or contact your retailer for specific terms and conditions. The warranty typically covers defects in materials and workmanship under normal use.
10. 고객 지원
For technical assistance, troubleshooting, or service inquiries, please contact Voltcraft customer support or your local distributor. Contact information can usually be found on the manufacturer's web사이트 또는 제품 포장에 표시되어 있습니다.