
소개
This manual provides essential instructions for the installation, operation, maintenance, and troubleshooting of the IBM 49P1599 FRU System Board. This system board is designed for personal computers, featuring a 400/533 Front Side Bus, integrated 10/100 Ethernet, and support for DDR2 memory.
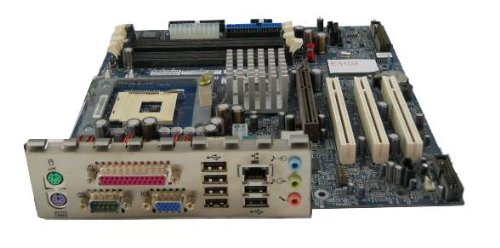
Image: The IBM 49P1599 FRU System Board. This image displays the main components and layout of the motherboard, including CPU socket, memory slots, and various connectors.
설정 및 설치
Careful installation is crucial for the proper functioning of your system board. Always handle the board by its edges to avoid static discharge.
1. 설치 준비
- Ensure your computer case is compatible with the system board's form factor.
- 필요한 도구를 준비하세요: 십자 드라이버, 정전기 방지 손목 스트랩.
- Unplug the power supply from the wall outlet before beginning.
2. Installing the System Board
- 컴퓨터 케이스의 뒤쪽 개구부에 I/O 실드를 설치합니다.
- Carefully align the system board with the standoffs in the case.
- Secure the system board with screws, ensuring it is firmly seated.
3. 구성 요소 설치
프로세서(CPU)
This system board is supplied without a processor. Refer to your CPU's manual for specific installation instructions. Ensure the CPU is correctly oriented in the socket before securing the retention lever.
메모리(RAM)
The board supports DDR2 RAM and has 2 memory slots.
- 메모리 슬롯 양쪽 끝에 있는 클립을 엽니다.
- 메모리 모듈을 슬롯에 맞춰서 모듈의 홈이 슬롯의 키와 일치하는지 확인합니다.
- 클립이 제자리에 고정될 때까지 모듈의 양쪽 끝을 단단히 누릅니다.
그래픽 카드
The system board features an Integrated Graphics Card Interface and a PCI-Express x16 slot for dedicated graphics cards.
- Locate the PCI-Express x16 slot.
- 케이스에서 해당 확장 슬롯 덮개를 제거하십시오.
- Insert the graphics card firmly into the slot until it clicks. Secure it with a screw to the case.
4. 케이블 연결하기
- 전원 커넥터 : Connect the main 24-pin ATX power connector and the 4-pin CPU power connector from your power supply to the system board.
- SATA 장치: Connect SATA 3 data cables from your storage devices (hard drives, SSDs) to the SATA ports on the system board.
- 전면 패널 커넥터: Connect the power button, reset button, HDD LED, power LED, and USB ports from your case to the corresponding headers on the system board. Refer to the board's silkscreen labels for correct orientation.
- 이더넷: The board has integrated 10/100 Ethernet. Connect your network cable to the RJ-45 port on the I/O panel.
작동 지침
After completing the physical installation, you can proceed with the initial boot and operating system setup.
1. 초기 부팅
- 모든 구성 요소가 단단히 연결되어 있는지 확인하십시오.
- 모니터, 키보드, 마우스를 연결하세요.
- Plug in the power supply and turn on the system.
- 시스템 전원이 켜지고 모니터에 화면이 표시될 것입니다.
2. BIOS/UEFI 설정
During the initial boot sequence, press the designated key (commonly DEL, F2, F10, or F12) to enter the BIOS/UEFI setup utility. Here you can configure boot order, system time, and other hardware settings. Save changes before exiting.
3. 운영체제 설치
This system board is compatible with platforms such as Windows 10. Insert your operating system installation media (USB drive or DVD) and follow the on-screen prompts to install the operating system. Ensure all necessary drivers for the system board components are installed after the OS installation.
유지
Regular maintenance helps ensure the longevity and stable performance of your system board.
- 청소: Periodically clean dust from the system board and components using compressed air. Ensure the system is powered off and unplugged before cleaning.
- BIOS 업데이트: Check the official IBM support website for BIOS updates. BIOS updates can improve compatibility, stability, and performance. Follow the provided instructions carefully when updating the BIOS.
- 구성 요소 검사: Ensure all cables and components remain securely connected.
문제 해결
문제가 발생하면 다음의 일반적인 문제 해결 단계를 참조하세요.
전원이 없습니다
- Verify the power supply is connected to the wall outlet and turned on.
- Check that the 24-pin and 4-pin power connectors are securely attached to the system board.
- Ensure the front panel power button cable is correctly connected to the system board header.
디스플레이 없음
- Confirm the monitor is powered on and connected to the correct video output (either integrated or dedicated graphics card).
- (해당되는 경우) 그래픽 카드와 메모리 모듈을 다시 장착하십시오.
- 가능하다면 다른 모니터나 비디오 케이블을 사용하여 테스트해 보세요.
시스템 부팅 실패
- 느슨한 케이블이나 구성 요소가 있는지 확인하세요.
- Ensure the CPU is properly seated and its cooler is installed correctly.
- Try booting with only one memory module installed, rotating through the modules and slots to identify a faulty one.
- Reset the BIOS to default settings (refer to your system board's specific instructions for clearing CMOS).
명세서
보증 및 지원
For warranty information and technical support, please refer to the official IBM website or contact your point of purchase. Keep your proof of purchase for warranty claims. IBM provides resources and support for its products to ensure customer satisfaction.
추가 지원을 받으려면 다음을 방문하세요. IBM 지원 web대지.
Ask a question about this manual
Ask about setup, troubleshooting, compatibility, parts, safety, or missing instructions. Manuals+ will review the question and use this page’s manual context to help answer it.
Posting as .
After a successful submission, we securely hash the supplied account or form email before sending it to Microsoft Advertising for conversion attribution. Privacy details.
| 특징 | 사양 |
|---|---|
| 모델 번호 | 49P1599 FRU |
| 프론트 사이드 버스(FSB) | 400/533MHz |
| RAM 메모리 기술 | DDR2 |
| 메모리 클럭 속도 | 2133MHz |
| 사용 가능한 메모리 슬롯 | 2 |
| 그래픽 카드 인터페이스 | Integrated, PCI-Express x16 |
| 시스템 버스 표준 지원 | SATA 3 |
| Integrated Ethernet | 10/100Mbps |
| 호환 장치 | 개인용 컴퓨터 |
| 플랫폼 호환성 | 윈도우 10 |
| 품목 무게 | 8파운드 |