1. 소개 및 이상view
This manual provides essential information for the safe and efficient operation, maintenance, and troubleshooting of your JET JSG-6DC Benchtop Belt and Disc Sander. Please read and understand all instructions before operating the machine.

Figure 1: JET JSG-6DC Benchtop Belt and Disc Sander
The image displays the complete JET JSG-6DC Benchtop Belt and Disc Sander, showcasing its primary components including the belt sanding arm on the left, the disc sanding plate on the right, and the motor housing in the center with the power switch.
주요 특징:
- 강력한 모터: Equipped with a 1-1/2 HP motor for demanding sanding tasks.
- Dual Sanding Surfaces: Features a 6" x 48" belt and a 12" disc for versatile applications.
- Adjustable Belt Arm: The belt can be used horizontally, vertically, or at any angle in between.
- Precision Tables: Cast iron tables with miter gauge slots and positive stops at 90 and 45 degrees.
- 효율적인 먼지 수집: Single 4" dust port for effective dust extraction from both sanding surfaces.
- Graphite Platen: Graphite-covered steel platen for cooler operation and extended belt life.
- 쉬운 조정: Dual thumbscrew belt tracking adjustment and quick-release belt tension lever.
2. 안전 지침
전동 공구를 사용할 때는 화재, 감전, 부상의 위험을 줄이기 위해 항상 기본 안전 예방 조치를 준수하십시오. 나중에 참고할 수 있도록 이 설명서를 보관하십시오.
일반 안전 규칙:
- 작업 영역: 작업 구역을 깨끗하고 밝게 유지하세요. 어수선하거나 어두운 구역은 사고를 초래합니다.
- 전기 안전: 전동 공구를 비나 습기에 노출시키지 마십시오. 접지된 표면에 신체가 닿지 않도록 하십시오.
- 개인 안전: Always wear eye protection. Use hearing protection when operating the sander. Wear appropriate clothing; avoid loose clothing, jewelry, and long hair that can get caught in moving parts.
- 기계 작동: Do not force the tool. Use the correct tool for your application. Ensure the power switch is in the OFF position before connecting to power.
- 유지: 공구를 조정하거나 액세서리를 변경하거나 보관하기 전에 전원에서 플러그를 분리하십시오.
- 먼지 수집: Always connect the sander to a dust collection system to minimize airborne dust and maintain a clear workspace.
3. 구성 요소 및 제어
Familiarize yourself with the various parts of the sander before operation.
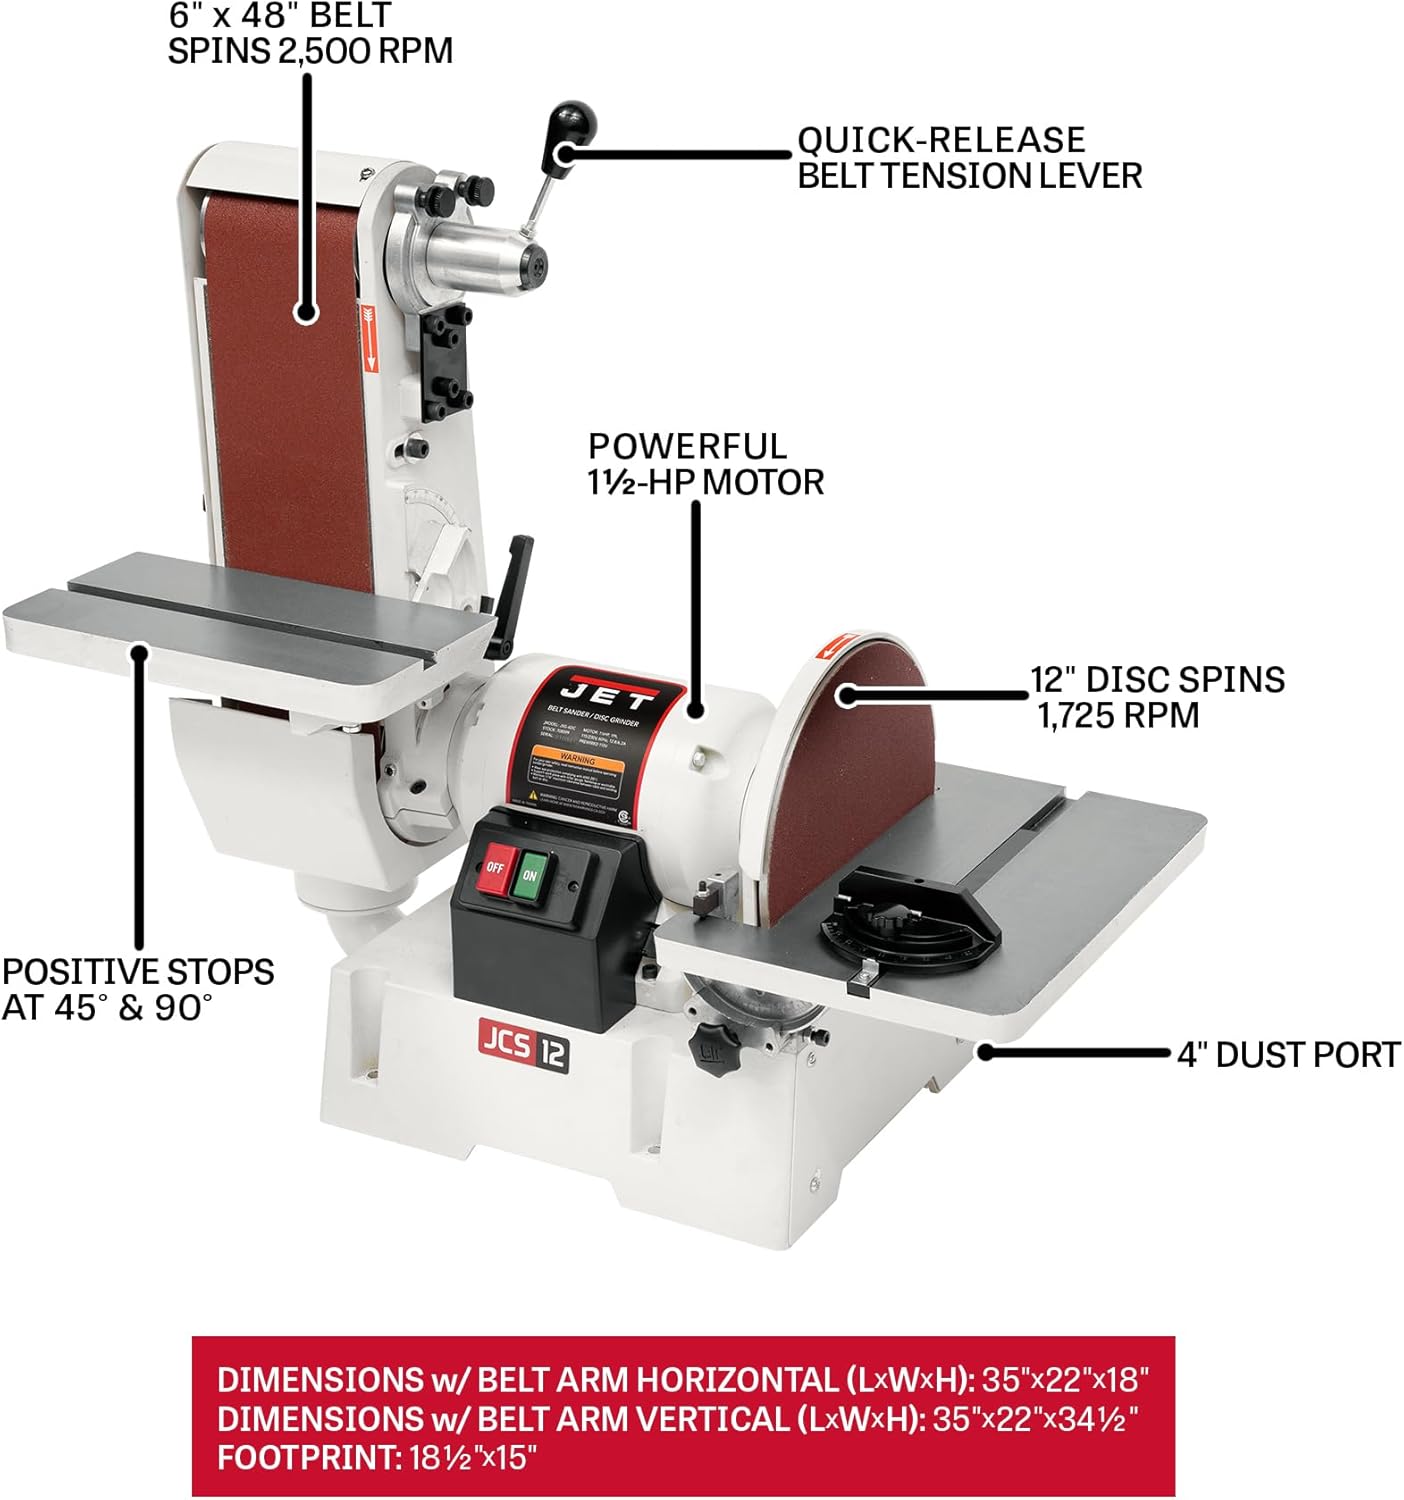
Figure 2: Key Components of the JSG-6DC Sander
This diagram illustrates the main components of the sander, including the 6" x 48" belt, 12" disc, 1-1/2 HP motor, quick-release belt tension lever, dual thumbscrew belt tracking adjustment, positive stops at 45° & 90°, and the 4" dust port.
- Belt Sanding Arm: Holds the 6" x 48" abrasive belt. Can be adjusted for horizontal, vertical, or angled sanding.
- Disc Sanding Plate: The 12" diameter disc for flat sanding operations.
- 작업대: Two precision-ground cast iron tables, one for the belt and one for the disc, with miter gauge slots.
- 마이터 게이지: Used with the work tables for accurate angle sanding.
- 전원 스위치: ON/OFF switch located on the motor housing.
- 더스트 포트: 4-inch diameter port for connecting to a dust collection system.
- 벨트 추적 조정: Dual thumbscrews for precise alignment of the sanding belt.
- 벨트 장력 조절 레버: Quick-release lever for easy belt changes.
4. 설치 및 조립
포장 풀기 및 검사:
Carefully remove the sander and all components from the packaging. Inspect for any shipping damage. Report any damage immediately to your dealer.
놓기:
Place the sander on a sturdy, level workbench or an optional stand. Ensure adequate space around the machine for safe operation and material handling.
전기 연결:
- The JSG-6DC is prewired for 115V operation. It can be rewired for 230V by a qualified electrician if needed.
- 전원 공급 장치가 볼륨과 일치하는지 확인하십시오.tage requirements of the sander.
- Connect the sander to a grounded outlet.
Dust Collection System Connection:
Connect a 4-inch dust collection hose to the dust port located at the rear of the sander base. Proper dust collection is crucial for safety and machine longevity.

Figure 3: 4-Inch Dust Port
클로즈업 view of the 4-inch dust port, designed for connecting to an external dust collection system to manage sanding debris.
5. 운영
시작 및 중지:
- To start the sander, press the green "ON" button.
- To stop the sander, press the red "OFF" button.
Using the Belt Sander:
- Belt Arm Adjustment: The belt arm can be positioned from horizontal to vertical. Loosen the locking knob, adjust the arm to the desired angle, and tighten the knob securely.
- 벨트 추적: Use the dual thumbscrew belt tracking adjustment to ensure the belt runs centrally on the rollers. Adjust while the sander is running (briefly) until the belt tracks correctly.
- 공작물 지지대: Utilize the belt work table for supporting your workpiece. The table can be adjusted for angle sanding.
- 샌딩 기술: Apply light, even pressure. Move the workpiece smoothly across the belt to prevent uneven sanding and overheating.

Figure 4: Dual Thumbscrew Belt Tracking Adjustment
A close-up of the dual thumbscrews used for precise adjustment of the sanding belt's tracking, ensuring it stays centered during operation.

Figure 5: Preset Stops for Work Tables
This image shows the mechanism for setting the work tables with positive stops at 90 and 45 degrees, facilitating accurate angle sanding.
Using the Disc Sander:
- Work Table Adjustment: The disc work table can be tilted and locked at various angles, with positive stops at 90 and 45 degrees.
- 마이터 게이지: Insert the miter gauge into the table slot for precise angle sanding on the disc.
- 샌딩 기술: Always sand on the downward-rotating side of the disc (left side when facing the disc) to prevent the workpiece from being thrown.

Figure 6: Precision-Ground Cast Iron Tables
A view of the robust cast iron work tables, highlighting their precision-ground surface for stable and accurate workpiece support during sanding.
6. 유지관리
정기적인 유지보수는 최적의 성능을 보장하고 샌더의 수명을 연장시켜 줍니다. 유지보수를 하기 전에는 반드시 전원을 차단하십시오.
청소:
- After each use, clean dust and debris from the machine, especially around the motor vents, belt, and disc areas.
- Use compressed air or a brush. Do not use solvents that may damage plastic parts.
벨트 교체:
- 전원을 분리하십시오.
- Release the quick-release belt tension lever.
- Remove the old belt and install the new 6" x 48" belt, ensuring the directional arrow on the belt matches the arrow on the machine.
- Re-engage the tension lever and adjust belt tracking.
디스크 교체:
- 전원을 분리하십시오.
- Remove the quick-lock dust cover for access to the disc.
- Peel off the old adhesive-backed 12" sanding disc.
- Clean the disc plate thoroughly before applying a new disc.
- Align and firmly press the new disc onto the plate.

Figure 7: Graphite-Covered Steel Platen
클로즈업 view of the graphite-covered steel platen, which helps reduce friction and heat buildup, extending the life of the sanding belt.
7. 문제 해결
이 섹션에서는 샌더 사용 중 발생할 수 있는 일반적인 문제에 대해 설명합니다.
| 문제 | 가능한 원인 | 해결책 |
|---|---|---|
| 샌더는 시작하지 않습니다 | 전원이 들어오지 않고, 스위치에 결함이 있고, 회로 차단기가 작동했습니다. | Check power connection, wall outlet, circuit breaker. Inspect switch for damage. |
| Belt tracks unevenly | Incorrect belt tracking adjustment, worn belt. | Adjust belt tracking using thumbscrews. Replace worn belt. |
| 과도한 진동 | Loose components, unbalanced disc, worn bearings. | Check all fasteners. Ensure disc is properly seated. Contact service if bearings are suspected. |
| 먼지 수집이 잘 안 됨 | Clogged dust port/hose, inadequate dust collector. | Clear obstructions from dust port and hose. Ensure dust collector is operating efficiently. |
| Sander bogs down under load | Overloading, dull abrasive, incorrect voltage. | Reduce pressure on workpiece. Replace abrasive belt/disc. Verify correct voltag전자 공급. |
8. 사양
| 사양 | 세부 사항 |
|---|---|
| 모델 번호 | JSG-6DC |
| 부품 번호 | 708599 |
| 모터 | 1-1/2 HP, 115/230V, 1Ph (prewired 115V) |
| Amp평균 전압(115V) | 12.8 Amps |
| 벨트 사이즈 | 6인치 x 48인치 |
| 벨트 속도 | 2,500 SFPM (Surface Feet Per Minute) |
| 디스크 직경 | 12인치 |
| 디스크 속도 | 1,725 RPM |
| 전체 치수(길이 x 너비 x 높이) | 35" x 22" x 34.5" (with belt arm vertical) |
| 무게 | 215파운드 |
| 재료 | 주철, 강철 |
| Included Abrasives | 60 Grit Belt, 60 Grit Disc |

Figure 8: Belt and Disc Speeds
This image highlights the operational speeds of the sander: the belt spins at 2,500 SFPM and the disc spins at 1,725 RPM.
9. 보증 및 지원
보증 정보:
The JET JSG-6DC Benchtop Belt and Disc Sander is covered by a 5년 보증이 보증은 정상적인 사용 및 서비스 조건에서 발생하는 재료 및 제조상의 결함에 적용됩니다.

Figure 9: JET 5-Year Warranty
The image displays the official JET 5-Year Warranty logo, indicating the product's coverage period.
For full warranty details, terms, and conditions, please refer to the official JET web사이트를 방문하거나 고객 지원팀에 문의하세요.
고객 지원:
For technical assistance, parts, or service inquiries, please contact JET customer support. Have your model number (JSG-6DC) and serial number ready when contacting support.
공식을 방문하세요 아마존에서 JET 스토어를 만나보세요 자세한 정보와 제품 액세서리를 확인하세요.